|
|
KEN
KOCH’S 1934 FORD ROADSTER PROJECT
Most Powerful EV Built to Date |
Last revised: October 2013 |
'34 Roadster Illustration by Chip Gribben
TO DREAM THE DREAM |
Click the images for a bigger
picture |
 Having
sold KTA Services, the EV parts supply business, I now am able to achieve
some semblance of retirement. This has created extra time whereby I can
work on a personal project I’ve wanted to do for a very long time:
To build up a 1934 Ford roadster street rod. Back in high school I used
to race my car at a local drag strip on weekends, and this created a
need for speed that’s still in my blood today. When I was a teenager,
everyone dreamt of having an early 30’s street rod. I was no exception.
Of course, at that time not many could afford to fulfill this dream. For
anyone who eventually could afford it, it simply had to wait until years
later. Well, now’s the time, before it’s too late! What could
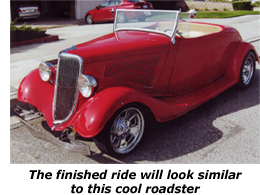
be nicer than a gorgeous-looking street rod which is ELECTRIC and possesses
HUNDREDS of ponies under the hood? Having
sold KTA Services, the EV parts supply business, I now am able to achieve
some semblance of retirement. This has created extra time whereby I can
work on a personal project I’ve wanted to do for a very long time:
To build up a 1934 Ford roadster street rod. Back in high school I used
to race my car at a local drag strip on weekends, and this created a
need for speed that’s still in my blood today. When I was a teenager,
everyone dreamt of having an early 30’s street rod. I was no exception.
Of course, at that time not many could afford to fulfill this dream. For
anyone who eventually could afford it, it simply had to wait until years
later. Well, now’s the time, before it’s too late! What could
be nicer than a gorgeous-looking street rod which is ELECTRIC and possesses
HUNDREDS of ponies under the hood?
INSPIRATION COMES NEXT
Any project conceived by the human mind requires inspiration
to build it and sustain it. This roadster project may have been conceived
in my teenage years, but the type of drive system employed didn’t
come into focus until years later. Sure, I could have built up a 500+
hp Hemi and put it under the hood, but that’s been done many times
before. After watching the EV industry grow to produce higher and higher-powered
motors, controllers, and batteries, this project absolutely had to be
powered by an all-electric drive system. However, all of this thinking
didn’t come together without the influence and inspiration of others.
 First
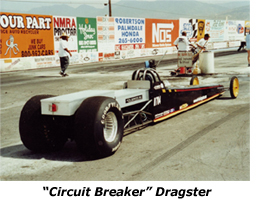
and foremost I must thank my good racing buddy, Jim Ludiker, whom I partnered
with to create the “Circuit Breaker” dragster. This race machine
was a test bed for our ideas, crafted into hardware, and then tested under
such extreme conditions that it would shock the average drag strip attendee
if he/she only knew what we were up to. The “Circuit Breaker”
saw its best 1/4-mile performance from 1999 through 2001: 136 mph in 9.44
seconds. That’s not bad for something full of lead! This machine
was a converted top alcohol dragster (250”) that formerly contained
a 2000 hp engine. We stuffed in a pair of stock 12” G.E. motors,
ran a pair of 1800 amp Café Electric Godzilla controllers, and
twin 336-volt JCI Inspira battery packs. The rest of the drive system
consisted of a 2-speed racing power glide tranny and a heavy-duty Ford
9” rear end. The dragster was inspirational: 60 ft. time of 1.28
sec.; 1/8-mile at 5.82 sec/119 mph; 0-60 mph in 1.85 sec. First
and foremost I must thank my good racing buddy, Jim Ludiker, whom I partnered
with to create the “Circuit Breaker” dragster. This race machine
was a test bed for our ideas, crafted into hardware, and then tested under
such extreme conditions that it would shock the average drag strip attendee
if he/she only knew what we were up to. The “Circuit Breaker”
saw its best 1/4-mile performance from 1999 through 2001: 136 mph in 9.44
seconds. That’s not bad for something full of lead! This machine
was a converted top alcohol dragster (250”) that formerly contained
a 2000 hp engine. We stuffed in a pair of stock 12” G.E. motors,
ran a pair of 1800 amp Café Electric Godzilla controllers, and
twin 336-volt JCI Inspira battery packs. The rest of the drive system
consisted of a 2-speed racing power glide tranny and a heavy-duty Ford
9” rear end. The dragster was inspirational: 60 ft. time of 1.28
sec.; 1/8-mile at 5.82 sec/119 mph; 0-60 mph in 1.85 sec.
Nobody could talk about EV racing inspiration without mentioning
Dennis Berube and his “Current Eliminator” dragster and “Smoke
Screen” Chevy S10 pickup. Dennis has more 1/4-mile time slips than
all the rest of EV drag racing combined. Some of his time slips are sub
8-seconds, with his best “Current Eliminator” effort in December
2007 at 7.956 sec./160 mph. Even more impressive are Shawn Lawless's "Rocket" motorcycle numbers of 7.41 sec/179 mph in September 2010, and also Bill Dube’s Killa-Cycle performance of 7.890 sec./174 mph in October 2008. The National
Electric Drag Racing Association (NEDRA) world is hoping that all three of these racers will be able to duke it out on the track someday. In the not to distant future drag racing could
see its first 6-sec./200 mph pass in an electric. Dennis, Shawn, and Bill are the person's
most likely to make this happen.
 Three
years ago Tom Conley brought his ’28 Ford EV roadster (with ’32
grille) to my shop and asked me to work on it. The wiring needed some
help. Tom is about my age, and this lucky guy’s been building roadsters
most of his adult life – about 18 in all. This roadster may be work
in progress, but what fun and inspiration it was to have it around for
a brief while. The car truly is a street rod, even though it was never
intended to burn up the streets. It has a 48-volt battery pack with a
5 hp motor and controller from a lift truck. Top speed is only 33 mph,
but the roadster does everything Tom intended for it. It’s well
known around the streets of Lake Havasu, providing him with one of the
neatest rides in town. Tom has provided much-needed mentoring to give
my street rod the right roadster equipment and just the right look. Three
years ago Tom Conley brought his ’28 Ford EV roadster (with ’32
grille) to my shop and asked me to work on it. The wiring needed some
help. Tom is about my age, and this lucky guy’s been building roadsters
most of his adult life – about 18 in all. This roadster may be work
in progress, but what fun and inspiration it was to have it around for
a brief while. The car truly is a street rod, even though it was never
intended to burn up the streets. It has a 48-volt battery pack with a
5 hp motor and controller from a lift truck. Top speed is only 33 mph,
but the roadster does everything Tom intended for it. It’s well
known around the streets of Lake Havasu, providing him with one of the
neatest rides in town. Tom has provided much-needed mentoring to give
my street rod the right roadster equipment and just the right look.
EARLY PROJECT DECISIONS
No project can be completed until its inclination, time,
and money all coincide at the same time. No problem with the inclination
part. Once the budget was established, creating enough time was the next
challenge. Things gradually got under way in late 2005. First, I needed
to decide whether I truly should be building a street roadster that can
be licensed and insured to drive on public roads, or should it be a dedicated
racecar that could be driven only on the drag strip? After all, the car’s
drive system I had in mind could produce up to 800 hp. However, full-out
performance with 800 peak hp, lithium ion batteries, and 2600 lbs., in
theory, calculates out to a very scary 157 mph at about 8.7 seconds in
the 1/4-mile. Being enamored with these numbers for a brief while, I had
to ask myself if this was what I really wanted to accomplish.  It
would require building a custom race vehicle with a chrome-moly tube chassis,
full roll cage, and all the other equipment that the NHRA requires for
this kind of performance. It would be impossible to drive it on the street.
After a while I finally came to my senses and decided that the roadster
would be one my wife and I could enjoy driving on the street, plus take
to car shows, parades, and hot rod cruises. Trips to the drag strip to
check its performance and race against others then became only secondary
in purpose. There was no reason to produce 800 peak hp to accomplish what
we wanted the roadster to do – but – 600 would be adequate!
Hmmmm, let’s see: 600 peak hp, lithium ions, and 2600 lbs. calculates
out to a more reasonable 142 mph and 9.4 seconds in the 1/4. Now that’s
a bit more sane. It
would require building a custom race vehicle with a chrome-moly tube chassis,
full roll cage, and all the other equipment that the NHRA requires for
this kind of performance. It would be impossible to drive it on the street.
After a while I finally came to my senses and decided that the roadster
would be one my wife and I could enjoy driving on the street, plus take
to car shows, parades, and hot rod cruises. Trips to the drag strip to
check its performance and race against others then became only secondary
in purpose. There was no reason to produce 800 peak hp to accomplish what
we wanted the roadster to do – but – 600 would be adequate!
Hmmmm, let’s see: 600 peak hp, lithium ions, and 2600 lbs. calculates
out to a more reasonable 142 mph and 9.4 seconds in the 1/4. Now that’s
a bit more sane.
The most popular early Ford being restored or built today
is the 1932. The “Deuce,” as it’s called, is very recognizable
with its bull nose grille. My initial preference was to build up a ’32,
but then I discovered that it wouldn’t have enough room under the
hood for the two-motor drive system I wanted to use. I also learned that
a ’32 isn’t too spacious when it comes to legroom, so I opted
to go with a ’34 instead. There’s ample room to mount two
big motors in tandem configuration, which is a must. The ’34 also
has more legroom and a slightly longer wheelbase compared to the ’32.
Since the ’34 was a close second choice in personal preference,
I decided that I’d go with the ’34. Its grille (as shown on
the left) is probably the most distinctive of all the early Fords.
ELECTRICAL DRIVE MOTORS
The “Circuit Breaker” dragster was retired and
parted out in late 2005. I purchased the two motors, ATO power glide transmission,
and some of the electronics before the rest of it wound up in Australia
via E-bay. This purchase seemed the right thing to do if I were going
to give my roadster a good foundation for high performance. (Besides that,
I didn’t want the two 300 peak hp motors to wind up in someone else’s
hands, and my having to race against them someday.) After conferring with
Dennis Berube, I was convinced that he could perform some of his special
magic to make them 400 peak hp each. Dennis took on the task, but it was
a daunting one that consumed months of meticulous work in his spare time.
I had to promise that I wouldn’t put these two monsters in a dragster
and race them against him.
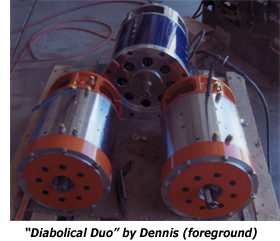 At
last the motors are completed, tested, and are ready for installation.
The motor bodies are industrial hard chrome plated with powder-coated
ends to match the chrome and metallic candy tangerine color theme of the
roadster. Shown in the photo to the right, they look absolutely terrific!
I’ve decided to dub them the “Diabolical Duo” by Dennis.
(Also shown is the monster 13” G.E. motor Dennis built up to go
into his new Chevy S10 “Smoke Screen” race truck.) The “Diabolical
Duo,” when chain-coupled end-to-end, represent the most At
last the motors are completed, tested, and are ready for installation.
The motor bodies are industrial hard chrome plated with powder-coated
ends to match the chrome and metallic candy tangerine color theme of the
roadster. Shown in the photo to the right, they look absolutely terrific!
I’ve decided to dub them the “Diabolical Duo” by Dennis.
(Also shown is the monster 13” G.E. motor Dennis built up to go
into his new Chevy S10 “Smoke Screen” race truck.) The “Diabolical
Duo,” when chain-coupled end-to-end, represent the most
powerful pair of EV motors in captivity. Here are some of the specs for
each motor:
-
Series-wound DC, 4-pole, w/interpole windings
-
12” diameter, 230 lbs.
-
400 peak horsepower
-
8000 rpm maximum
-
400 volts DC maximum
-
2000 amps DC maximum
-
1000 ft.-lbs. peak torque
ELECTRONIC MOTOR CONTROLLERS
Of course, the roadster had to have the best, most powerful
motor controllers available. They also needed to be computer-programmable.
There is some lead-time to endure, but they are an absolute must if you’re
gonna go racing. These are the Zilla Z2K-EHVs made by Café Electric.
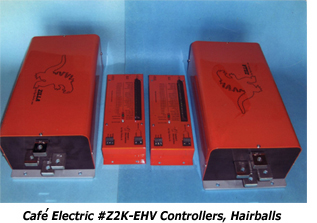 |
I had two of them built, along with
their “Hairball” logic control boxes, and after 6 months
they were delivered exactly as I wanted them with metallic candy
tangerine cases. One will be applied to each motor, and each will
have its own 370-volt battery pack. Individual specs are as follows:
- 36-400 volts DC max voltage range
- 2000 amps DC maximum
- 15.7 kHz switching frequency
- 640 kW peak power
- Programmable battery voltage & current limits
- Programmable motor voltage & current limits
- Liquid cooled
- 37 lbs.
|
ELECTRICAL INSTRUMENTATION
Once the battery pack maximum voltage and current, maximum
motor current, plus rpm range were established, it then became possible
to define the instrumentation. 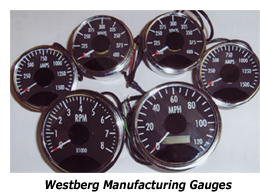 And
since there would be two battery packs, two motors, and two controllers,
it was a natural decision to monitor all of those things with some pretty
nice–looking gauges. Everything would have to be custom made, and
the folks who do that best are Westberg Manufacturing. The analog speedometer/odometer
and tachometer are 3.75” diameter, and are programmable with magnetic
pickup drivers. The ammeters and voltmeters also are analog, voltage driven,
and 3.00” diameter. Individual specs are as follows: And
since there would be two battery packs, two motors, and two controllers,
it was a natural decision to monitor all of those things with some pretty
nice–looking gauges. Everything would have to be custom made, and
the folks who do that best are Westberg Manufacturing. The analog speedometer/odometer
and tachometer are 3.75” diameter, and are programmable with magnetic
pickup drivers. The ammeters and voltmeters also are analog, voltage driven,
and 3.00” diameter. Individual specs are as follows:
- Tachometer is 0-8000 rpm, pulse-driven
- Speedometer is 0-120 mph, LCD odometer readout
- Both ammeters are 0-1500 amps, 50 mVFS
- Both voltmeters are 200-400 vdc
- 12-volt illumination on all gauges
THE WHEELS PRECEDE
Having never built a street rod from scratch, I thought
that I could simply order a fiberglass ’34 body, have a frame and
chassis manufacturer put together one of their ’34 packages, and
then slap on a trick set of wheels. 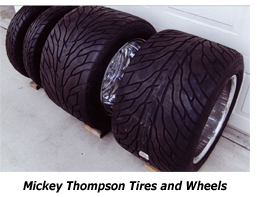 Little did I know that it all starts with the wheels. The chassis totally
depends on tire size and wheel backspacing. The body to a large extent
does too, because clearances need to conform to wheel diameters and widths.
I also knew that I wanted lots of stopping power, so 13” diameter
brakes were preferred. This meant that the wheels had to be at least 17”
to accommodate the brakes. Another requirement was to have the right look
with skinny tires up front, and fat tires in the rear, all with matching
tread pattern. I poured through tons of wheel and tire brochures, and
finally settled on Mickey Thompson (M/T) tires and wheels. For the front
I ordered M/T Sportsman S/R radials in a #26X6.00R18LT size with HR-2
#15X4.5 wheels. For the rear I ordered M/T S/Rs in a #29X18.00R18LT size
with HR-2 #18X15.5 wheels. The wheels are forged and polished aluminum.
You’ll have to admit that I’ve achieved the “fat (17.2”
wide) vs. skinny (6.3” wide) look, but I know that the drive motors
put out a lot of torque, so the car would need serious rear “meats”
to hook up all that power to the tarmac.
Little did I know that it all starts with the wheels. The chassis totally
depends on tire size and wheel backspacing. The body to a large extent
does too, because clearances need to conform to wheel diameters and widths.
I also knew that I wanted lots of stopping power, so 13” diameter
brakes were preferred. This meant that the wheels had to be at least 17”
to accommodate the brakes. Another requirement was to have the right look
with skinny tires up front, and fat tires in the rear, all with matching
tread pattern. I poured through tons of wheel and tire brochures, and
finally settled on Mickey Thompson (M/T) tires and wheels. For the front
I ordered M/T Sportsman S/R radials in a #26X6.00R18LT size with HR-2
#15X4.5 wheels. For the rear I ordered M/T S/Rs in a #29X18.00R18LT size
with HR-2 #18X15.5 wheels. The wheels are forged and polished aluminum.
You’ll have to admit that I’ve achieved the “fat (17.2”
wide) vs. skinny (6.3” wide) look, but I know that the drive motors
put out a lot of torque, so the car would need serious rear “meats”
to hook up all that power to the tarmac.
FRAME, CHASSIS, AND SUSPENSION
Next, I looked around to see who might have a ’34
Ford chassis available that could handle the power of the drive system
and stop the vehicle quickly (just in case I might drive it fast someday).
After researching I concluded that Total Cost Involved Engineering (TCI)
had the best package with the most options. I chose their complete ’34
Pro-Street setup. It seemed the right decision because going this route
would save a lot of time compared to building much of it from scratch.
The frame is very strong and rigid, and is intended for “some of
the wildest, baddest street rods built.” I found TCI to be quite
knowledgeable based on their years of experience, and also very easy to
work with when it came to defining the right options. One thing that really
needed definition was what type of rear end could handle up to 4000 ft.-lbs
of input torque, and, be selectable as either a differential or a spool.
A differential for street driving was a must, as you can imagine the scrubbing
and squalling noise a set of 17.2” wide tires would make around
a turn if the rear end were locked up. The other side of the coin was
that I needed a locked rear end for racing if I hoped to aim the car in
a straight line. TCI’s solution was to use a Dana 60 “E-Locker.”
Pretty simple: It’s normally a differential; send it 12-volts and
it locks up electromechanically.
 |
Now that the ’34 Pro-Street chassis,
frame, and suspension are completed, I must say that the entire
package is everything I had hoped for. The frame is a piece of artwork
and the weld joints are a thing of beauty. The 4-link suspension
is set up to handle lots of torque. The stopping power should be
good. Here are some of the items that went into its construction:
- Custom independent front suspension
- Polished 13” front and rear drilled triple brake rotors
- Polished 6-piston brake calipers
- Stainless steel brake lines
- Chrome-moly 4-link suspension
- Dana 60 E-locker rear end, 4.11:1 gears
- Currie 35-spline forged alloy axles
- Billet yoke and pinion support
- Severe C-notch to accommodate rear wheels
- Billet adjustable rear coil-over shocks
- Master cylinder and 7” dual diaphragm brake booster
- Rear anti-sway bar
- Proportional valve, stop light switch, and line lock
- X-member central brace and drive shaft loop
- Rack and pinion steering
|
THE BODY, FENDERS, AND RUNNING BOARDS
 There
are lots of companies who manufacture early Ford bodies in fiberglass
and steel, but a very small number who make them in aluminum and carbon
fiber. The latter two were out of the question, in spite of their light
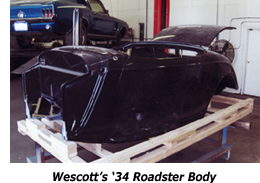
weight and strength, because the price tag was just too high. Wescott’s
Auto Restyling specializes in fiberglass. After checking around they seemed
to have the best reputation for quality, fit, and completeness. We decided
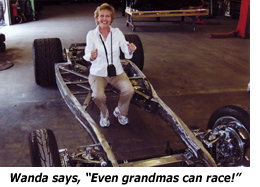
to check them out personally. In August, 2007, Wanda and I took a trip
to Oregon which included a Wescott’s factory tour. They were courteous,
helpful, and left us with the opinion that they are experts in their craft.
The steel braces they employ in specific areas around the body add strength
and rigidity. Initially I was concerned that the fiberglass pieces might
be excessively heavy at about 600 lbs., but Wescott’s allayed my
fears with a more respectable estimate of 400-450 lbs. There
are lots of companies who manufacture early Ford bodies in fiberglass
and steel, but a very small number who make them in aluminum and carbon
fiber. The latter two were out of the question, in spite of their light
weight and strength, because the price tag was just too high. Wescott’s
Auto Restyling specializes in fiberglass. After checking around they seemed
to have the best reputation for quality, fit, and completeness. We decided
to check them out personally. In August, 2007, Wanda and I took a trip
to Oregon which included a Wescott’s factory tour. They were courteous,
helpful, and left us with the opinion that they are experts in their craft.
The steel braces they employ in specific areas around the body add strength
and rigidity. Initially I was concerned that the fiberglass pieces might
be excessively heavy at about 600 lbs., but Wescott’s allayed my
fears with a more respectable estimate of 400-450 lbs.
They also took extra time to answer all of my questions. In February,
2008, we ordered the ’34 roadster body and all of the pieces. They
were delivered in June.
PUTTING IT ALL TOGETHER WITH A BUILDER
While the chassis and body were being readied, I looked
around in earnest for a shop that could put everything together –
everything except the electrical and electronics. Having a builder far
distant from my address didn’t make sense. Who wants to hop on an
airplane every time you need to answer questions, give direction, or make
critical decisions? So I looked within a 30-mile radius and found several
hot rod builders who had experience putting together street rods with
fiberglass bodies. Some were too busy and couldn’t take on the project
for months. 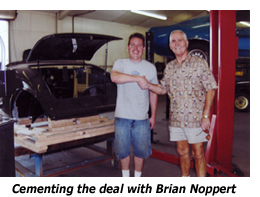 Still
others wanted you to ransom one of your kids for a down payment. But by
sheer coincidence I received three referrals to one builder all within
the same week. I picked up his business card at a powder coating shop,
another at a street rod show, and the third from my neighbor who has a
beautiful ’34 Ford roadster rebuilt by Brian Noppert of Ultimate
Customs. Brian’s shop is in Ontario, California, only 8 miles from
my house. All of this coincidence had to mean something, so I gave him
a call. “Hey Brian, we’ve never met before, but I feel as
though I know you. Your reputation and your work precede you, and I’ve
got a project that I think you’ll find unique and interesting.”
The conversation went well from there, and so we cemented the deal. Brian
is a multitalented young man whose portfolio of custom vehicles grows
with each passing day. A recent build of his is a ’50 Ford with
a blown Lincoln Navigator engine, featured in the September 2007 issue
of Hot Rod Magazine. I feel very confident with my pet project placed
in Brian’s hands. Still
others wanted you to ransom one of your kids for a down payment. But by
sheer coincidence I received three referrals to one builder all within
the same week. I picked up his business card at a powder coating shop,
another at a street rod show, and the third from my neighbor who has a
beautiful ’34 Ford roadster rebuilt by Brian Noppert of Ultimate
Customs. Brian’s shop is in Ontario, California, only 8 miles from
my house. All of this coincidence had to mean something, so I gave him
a call. “Hey Brian, we’ve never met before, but I feel as
though I know you. Your reputation and your work precede you, and I’ve
got a project that I think you’ll find unique and interesting.”
The conversation went well from there, and so we cemented the deal. Brian
is a multitalented young man whose portfolio of custom vehicles grows
with each passing day. A recent build of his is a ’50 Ford with
a blown Lincoln Navigator engine, featured in the September 2007 issue
of Hot Rod Magazine. I feel very confident with my pet project placed
in Brian’s hands.
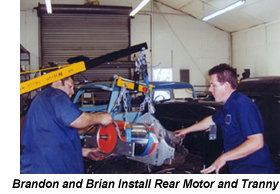 To
date, Ultimate Customs has accomplished about 85% of the work required.
They have designed and installed an adapter and motor mounts to put the
transmission and two motors in place. The motors are securely mounted
to the frame, and are joined together in the middle with a heavy-duty
chain coupler. Boy, what a job the motor installation was! Ordering the
roadster body with a 6-inch recessed firewall (for a big block engine)
was a good idea. Can you imagine installing 39 inches of motor length
under the hood of any vehicle, much less in a ’34 Ford? Nevertheless,
the two motors and the transmission have been engineered into place with
perfect alignment to the differential. To
date, Ultimate Customs has accomplished about 85% of the work required.
They have designed and installed an adapter and motor mounts to put the
transmission and two motors in place. The motors are securely mounted
to the frame, and are joined together in the middle with a heavy-duty
chain coupler. Boy, what a job the motor installation was! Ordering the
roadster body with a 6-inch recessed firewall (for a big block engine)
was a good idea. Can you imagine installing 39 inches of motor length
under the hood of any vehicle, much less in a ’34 Ford? Nevertheless,
the two motors and the transmission have been engineered into place with
perfect alignment to the differential.
 All
the body pieces have been installed, joined to the frame and each other,
and then tweaked for best fit and appearance. This includes the running
boards, fenders, grille, trunk lid, dashboard, hood top, and hood side
panels. Also in place are the two low-profile seats, windshield, headlights,
taillights, steering column and wheel, foot brake, accelerator pedal,
emergency brake and cables, remotely operated trunk latch, and drive shaft.
Just behind the grille a special shroud has been fabricated and installed.
This shroud closes off the grille except for two 400 cfm fans, each of
which can be used to force air into the motors and across a small transmission
cooler to provide cooling for the two Zilla controllers. Also installed
is a vertical 3/16” plate that will be used to mount up all the
power electronics. All
the body pieces have been installed, joined to the frame and each other,
and then tweaked for best fit and appearance. This includes the running
boards, fenders, grille, trunk lid, dashboard, hood top, and hood side
panels. Also in place are the two low-profile seats, windshield, headlights,
taillights, steering column and wheel, foot brake, accelerator pedal,
emergency brake and cables, remotely operated trunk latch, and drive shaft.
Just behind the grille a special shroud has been fabricated and installed.
This shroud closes off the grille except for two 400 cfm fans, each of
which can be used to force air into the motors and across a small transmission
cooler to provide cooling for the two Zilla controllers. Also installed
is a vertical 3/16” plate that will be used to mount up all the
power electronics.
The last 15% of Ultimate Customs’ work will be to
mount the battery boxes securely to the frame, build a bulkhead between
the trunk and passenger compartment, and finally to design and install
a six-point roll bar. After that it’s teardown the car and sort
all the parts into four piles: Paint, powder coat, chrome plate, or metal
polish. More later as work progresses….
THE BATTERIES, LOTS OF BATTERIES
 It
took a long time to finally resolve this portion of the roadster project.
I knew early on that I needed a set of batteries which would be nearly
equal to the 800 hp that could be produced by the motors. I also knew
that the batteries might be multiple smaller cells such as A123’s
#26650 M1 lithium-iron-phosphate. Even though the project was well underway
without a battery solution in hand, I was afraid that I might have to
remove the floorboard and do the Fred Flintstone thing if no solution
presented itself. Finally, I was contacted by the guys at Go Wheel Group,
and they referred me to ev-battery.com. They have been manufacturing 13.2
volt modules which contain 24 of the #26650's in a 4-series, 6-parallel
(4S6P) arrangement mostly for the motorcycle market. (Today, Derek Barger of High Tech Systems, LLC provides these and other custom battery packs for electric racing vehicles.) It
took a long time to finally resolve this portion of the roadster project.
I knew early on that I needed a set of batteries which would be nearly
equal to the 800 hp that could be produced by the motors. I also knew
that the batteries might be multiple smaller cells such as A123’s
#26650 M1 lithium-iron-phosphate. Even though the project was well underway
without a battery solution in hand, I was afraid that I might have to
remove the floorboard and do the Fred Flintstone thing if no solution
presented itself. Finally, I was contacted by the guys at Go Wheel Group,
and they referred me to ev-battery.com. They have been manufacturing 13.2
volt modules which contain 24 of the #26650's in a 4-series, 6-parallel
(4S6P) arrangement mostly for the motorcycle market. (Today, Derek Barger of High Tech Systems, LLC provides these and other custom battery packs for electric racing vehicles.)
After taking a close look at what ev-battery.com had to offer, I decided
that this approach made good sense. I knew I needed around 360 volts and
1200+ amps from each of the two battery packs. A total of 2592 cells could
produce this kind of power, but the wiring, interconnection, and battery
management (BMS) would be hugely complex. Instead, the same thing could
be accomplished by using 108 of the 13.2 volt modules that already contained
the BMS. Interwiring would be much simpler….simply interconnect
the main terminals using 3/4 X 3/16 inch solid copper bus bars. So, basically,
the plan is to have two battery packs each comprised of two parallel strings
of 27 modules. 54 modules per pack, 108 modules total. Each pack’s
rating is 356.4 volts nominal with an output current of 1440 amps maximum
for 10 seconds. This would be great for the drag strip, but would still
allow the roadster to have reasonable range, estimated at 75 to 125 miles-per-charge with conservative driving on a combination of city streets, highways, and freeways.
 I
recognized right away that it would be helpful to design and build a battery
tester, as it would be necessary to check all 108 battery modules from
time-to-time for power delivery and consistency. Of course, the most accurate
way to test batteries would be to charge them consistently, and then discharge
them consistently at a preset current level. Since the voltage of any
loaded battery varies with time, the load must remain constant. A simple
load resistor requires continual adjustment to keep the current constant,
and that’s way too time-consuming. I used two 400 amp motor controllers
and two high power resistor banks. Total current is held constant according
to potentiometer input, and is presettable from 0 to 800 amps. Input range
is 8.5 to 24 volts. The load shuts off automatically according to dialed
preset voltage. An elapsed time meter records load time to within 1/10th
of a second. I
recognized right away that it would be helpful to design and build a battery
tester, as it would be necessary to check all 108 battery modules from
time-to-time for power delivery and consistency. Of course, the most accurate
way to test batteries would be to charge them consistently, and then discharge
them consistently at a preset current level. Since the voltage of any
loaded battery varies with time, the load must remain constant. A simple
load resistor requires continual adjustment to keep the current constant,
and that’s way too time-consuming. I used two 400 amp motor controllers
and two high power resistor banks. Total current is held constant according
to potentiometer input, and is presettable from 0 to 800 amps. Input range
is 8.5 to 24 volts. The load shuts off automatically according to dialed
preset voltage. An elapsed time meter records load time to within 1/10th
of a second.
Testing a battery now is pretty simple. Dial in the shutoff voltage and
test current, zero the elapsed time meter, then push the start button.
When it’s done it shuts off. Simply record the elapsed time and
move on to the next battery. The tester is only a breadboard for now,
but it’s usable on any battery of 12 to 24 volts. It’s also
expandable in 400 amp increments. While the tester is heavy and somewhat
cumbersome, I can roll it to a battery pack and connect it to individual
batteries. Someday I may package it up into a metal console with cooling
fans.
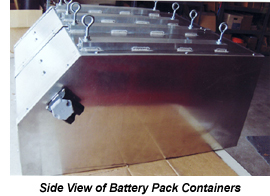
 Packaging
all 108 battery modules into the trunk of this ’34 Ford was challenging.
In the first place, space was limited because the wheel wells are tubbed
into the trunk 12 inches on each side to accommodate the super wide tires.
There was only so much room to work with. Each battery module measures
6.75” H. x 5.2” W. x 3.38” D. and weighs 5.65 lbs. Trying
to package them all in one layer wouldn’t work, so it became obvious
that multiple layers would be required. It was decided to place the batteries
into two individual aluminum boxes that could be lifted into or out of
the trunk with a hoist. The boxes are being placed into a mounting tray
which is attached to the frame. Each pack, including the box, will weigh
in at about 320 lbs. Packaging
all 108 battery modules into the trunk of this ’34 Ford was challenging.
In the first place, space was limited because the wheel wells are tubbed
into the trunk 12 inches on each side to accommodate the super wide tires.
There was only so much room to work with. Each battery module measures
6.75” H. x 5.2” W. x 3.38” D. and weighs 5.65 lbs. Trying
to package them all in one layer wouldn’t work, so it became obvious
that multiple layers would be required. It was decided to place the batteries
into two individual aluminum boxes that could be lifted into or out of
the trunk with a hoist. The boxes are being placed into a mounting tray
which is attached to the frame. Each pack, including the box, will weigh
in at about 320 lbs.
 The
batteries currently are on order. ev-battery.com has agreed to configure
the BMS for each of the 108 batteries to drive an LED indicator. 54 LED
indicators will be mounted on the sloping panel of each box, and will
give blink codes showing the status of individual batteries. Codes will
signal battery overvoltage, undervoltage, and overtemperature. A high
current 500 volt DC fuse will be mounted in each box. Also, each battery
is to have vent holes which will allow forced air cooling for extreme
operation such as when drag racing. A thin plenum will draft air through
holes in the end of each box that match up to the vent holes in the batteries.
The packs will have two-pin aircraft type high current disconnects on
their sides which will wire to the drive system. The
batteries currently are on order. ev-battery.com has agreed to configure
the BMS for each of the 108 batteries to drive an LED indicator. 54 LED
indicators will be mounted on the sloping panel of each box, and will
give blink codes showing the status of individual batteries. Codes will
signal battery overvoltage, undervoltage, and overtemperature. A high
current 500 volt DC fuse will be mounted in each box. Also, each battery
is to have vent holes which will allow forced air cooling for extreme
operation such as when drag racing. A thin plenum will draft air through
holes in the end of each box that match up to the vent holes in the batteries.
The packs will have two-pin aircraft type high current disconnects on
their sides which will wire to the drive system.
I expect the batteries to be delivered in early December. It is also
expected that the reassembled and freshly-painted car will be delivered
around Christmas time. After that, it will take me a couple of months
to install and complete all the electrical and power electronics. Upholstery
will come after that. More later as work progresses….
AT LAST….THE LONG OVERDUE UPGRADE New revision: October, 2010
Click the photos below to see a Larger Image. Click the Larger Images to see an even higher resolution version. You'll want to see all the details!
The foregoing original version of this story was left mostly intact to show how optimistic and silly a person can be when they’ve never before built a street rod from the ground up. The original guess was that this show-and–go electric hot rod could be completed in about one year. Yeah, right! It’s now 2-1/2 years into the build, and it still isn’t done! But I can’t say that I wasn’t warned in advance: “There’s no way in the world you can build a street rod from scratch in less than two years.” Well, my friends and advisors were absolutely right! Even though the project has made good progress in 2-1/2 years, my current best guess is that it’ll be registered, insured, and out on the road by the end of 2010.
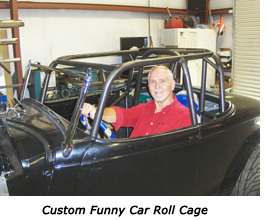 A bunch of custom fabrication went into this project. Probably about 100 special brackets, tabs, panels, holders, shrouds, boxes, and welded pieces were designed and hand-made….all very time consuming. To give the car additional safety for the street, a custom roll bar with side supports was fabricated by R J Fabrication. The roll bar bolts to the frame, and is now chrome plated. Also bolting to the frame in the same locations, R J created a beautiful funny car roll cage. Since NHRA rules state that any open-bodied car (roadster) running quicker than 11.0 seconds in the ¼-mile must have a roll cage, one was fabricated with beautiful TIG welds that the NHRA has certified down to 8.5 seconds. It’s now painted metallic orange to match the car. The chassis also is NHRA certified to 8.5 seconds. A bunch of custom fabrication went into this project. Probably about 100 special brackets, tabs, panels, holders, shrouds, boxes, and welded pieces were designed and hand-made….all very time consuming. To give the car additional safety for the street, a custom roll bar with side supports was fabricated by R J Fabrication. The roll bar bolts to the frame, and is now chrome plated. Also bolting to the frame in the same locations, R J created a beautiful funny car roll cage. Since NHRA rules state that any open-bodied car (roadster) running quicker than 11.0 seconds in the ¼-mile must have a roll cage, one was fabricated with beautiful TIG welds that the NHRA has certified down to 8.5 seconds. It’s now painted metallic orange to match the car. The chassis also is NHRA certified to 8.5 seconds.
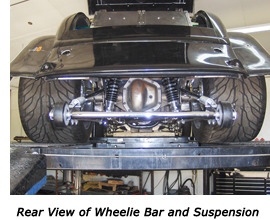 While this roadster project basically is a “show-n-go” street rod, early calculations suggested that with the right hardware and “tuning,” 135 mph and 9.60 seconds are possible in the ¼-mile. Besides the need for a certified roll cage and chassis, it also figured that with 2000 lb.-ft. of motor torque and a racing Powerglide transmission, this car could easily create daylight underneath the front wheels. A wheelie bar definitely would be required hardware for the drag strip. I love the picture to the right. If an EV photo could be “nasty” looking, this one is! There’s only 32 inches spacing between the inside of the rear “meats.” Since this photo was taken, everything has been chromed, polished, painted, or powder coated. Note at the top of the photo how tight the battery boxes fit into the trunk area. While this roadster project basically is a “show-n-go” street rod, early calculations suggested that with the right hardware and “tuning,” 135 mph and 9.60 seconds are possible in the ¼-mile. Besides the need for a certified roll cage and chassis, it also figured that with 2000 lb.-ft. of motor torque and a racing Powerglide transmission, this car could easily create daylight underneath the front wheels. A wheelie bar definitely would be required hardware for the drag strip. I love the picture to the right. If an EV photo could be “nasty” looking, this one is! There’s only 32 inches spacing between the inside of the rear “meats.” Since this photo was taken, everything has been chromed, polished, painted, or powder coated. Note at the top of the photo how tight the battery boxes fit into the trunk area.
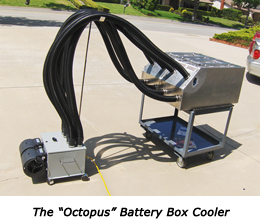 While the roadster spent an agonizing 7-1/2 months in body and paint getting a top-notch show quality paint job, I had plenty of time to work on battery issues. It figured that there wouldn’t be any battery temperature problems while driving on the street, but drag racing could be a whole different story. All batteries are stacked in line with vent holes aligned such that air can be forced through each of them from the front of the boxes and out vent holes in the rear. 4 strategic locations were chosen on each box where air could be injected. At the same time “Octomom” Nadya Suliman was in the news, she provided design inspiration for an 8-hose portable cooler of 1100 cfm to connect to the 8 cooling ports. In between racing runs, all batteries can be cooled for a few minutes with the “Octopus” forced air unit. While the roadster spent an agonizing 7-1/2 months in body and paint getting a top-notch show quality paint job, I had plenty of time to work on battery issues. It figured that there wouldn’t be any battery temperature problems while driving on the street, but drag racing could be a whole different story. All batteries are stacked in line with vent holes aligned such that air can be forced through each of them from the front of the boxes and out vent holes in the rear. 4 strategic locations were chosen on each box where air could be injected. At the same time “Octomom” Nadya Suliman was in the news, she provided design inspiration for an 8-hose portable cooler of 1100 cfm to connect to the 8 cooling ports. In between racing runs, all batteries can be cooled for a few minutes with the “Octopus” forced air unit.
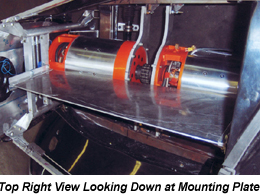
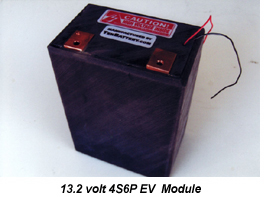
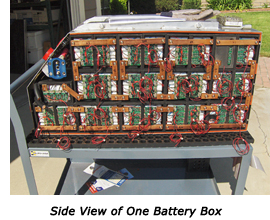 Once again, each battery module contains 24 ea. A123 #26650 lithium-iron phosphate cells in a 4S6P configuration. Nominal module voltage is 13.2 volts. Each of the two battery boxes consists of 54 ea. modules. A series string of 27 modules for 356.2 volts is paralleled with another 27 in each box. Maximum current per battery box is about 1400 amps. The two-box combined output is 2800 amps. The photo shows raw modules that are not yet enclosed. The smaller red and black wires connect to each module’s 4 BMS boards that send blink code data to the external LED indicators. Interconnections are made with 3/16” X 3/4” copper bars, now nickel plated. Maximum theoretical power is 917 hp. Combined total capacity is 19,673 kW-hrs. Once again, each battery module contains 24 ea. A123 #26650 lithium-iron phosphate cells in a 4S6P configuration. Nominal module voltage is 13.2 volts. Each of the two battery boxes consists of 54 ea. modules. A series string of 27 modules for 356.2 volts is paralleled with another 27 in each box. Maximum current per battery box is about 1400 amps. The two-box combined output is 2800 amps. The photo shows raw modules that are not yet enclosed. The smaller red and black wires connect to each module’s 4 BMS boards that send blink code data to the external LED indicators. Interconnections are made with 3/16” X 3/4” copper bars, now nickel plated. Maximum theoretical power is 917 hp. Combined total capacity is 19,673 kW-hrs.

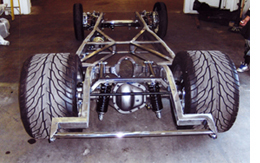
During the 7-1/2 month body shop odyssey, it was heartening to see finished pieces of the rolling chassis trickle in for assembly while the major part of the body and its pieces were being readied for paint. This rolling chassis photo is a real “money shot” for a magazine. It shows how nicely all of the driveline, suspension, steering, and brakes are done. The 4-link and Panhard bar at the rear should help the car hook up nicely. The 13” brakes will give lots of “whoa.” The two motors, the transmission, and their mounts look exquisite. Even the brake lines are polished stainless. The idea behind all of this was that the car should look consistently nice throughout, just in case some car show
judge should poke a mirror under it. No excuses required.
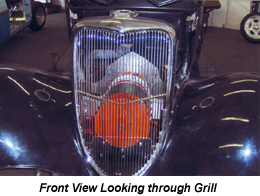
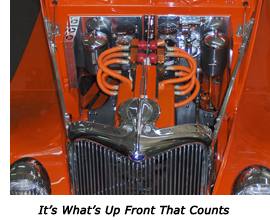 Also during the 7-1/2 month period I was able to design and configure the power components to their mounting plate, plus the two pump systems to their polished firewall plates. I delivered them to the shop for installation a little bit before the body pieces were finished and painted. This photo was taken after installation into the painted car. One look under the hood and you know that it “ain’t no Hemi or Big Block.” The two Zilla Z2KEHVs and their Hairballs are obvious, along with the (had to be) orange #4/0 power cables. Note the right-left symmetry. The finned “oil” coolers really are reservoirs. On the right is the power brake vacuum system and reservoir. On the left, there’s a controller coolant pump and reservoir that circulates (orange) coolant through a fan-cooled transmission cooler mounted behind the grille. Also during the 7-1/2 month period I was able to design and configure the power components to their mounting plate, plus the two pump systems to their polished firewall plates. I delivered them to the shop for installation a little bit before the body pieces were finished and painted. This photo was taken after installation into the painted car. One look under the hood and you know that it “ain’t no Hemi or Big Block.” The two Zilla Z2KEHVs and their Hairballs are obvious, along with the (had to be) orange #4/0 power cables. Note the right-left symmetry. The finned “oil” coolers really are reservoirs. On the right is the power brake vacuum system and reservoir. On the left, there’s a controller coolant pump and reservoir that circulates (orange) coolant through a fan-cooled transmission cooler mounted behind the grille.
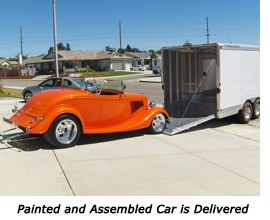 After the painted body and pieces were delivered to the shop, it took another 2-3 months for them to complete all of the mechanical assembly work. It was fun checking in to see how things were coming along. While I pretty much micromanaged this project and specified all of the parts and details, I knew exactly what it would look like when completed. If it didn’t come out right, it would be nobody’s fault but mine. Finally, in May 2010, the mechanically completed and painted car was delivered. What a joyous moment to see it come out of that trailer! Champagne was flowing in Murrieta, CA while friends and neighbors came around to get a look. One friend actually called me the next
morning to ask if I slept in the roadster overnight. After the painted body and pieces were delivered to the shop, it took another 2-3 months for them to complete all of the mechanical assembly work. It was fun checking in to see how things were coming along. While I pretty much micromanaged this project and specified all of the parts and details, I knew exactly what it would look like when completed. If it didn’t come out right, it would be nobody’s fault but mine. Finally, in May 2010, the mechanically completed and painted car was delivered. What a joyous moment to see it come out of that trailer! Champagne was flowing in Murrieta, CA while friends and neighbors came around to get a look. One friend actually called me the next
morning to ask if I slept in the roadster overnight.

I’m proud of how the roadster looks. It has a gorgeous metallic orange paint job that just radiates out in the sunlight. The fiberglass body and metal hood are as straight and smooth as the best of show cars. The car’s stance is perfect. With traditional stock type chrome grille, headlights, taillights, bumpers, and standard windshield with wind wings, it’s a mixture of the old and the new. The wheels make it look somewhat on the modern side, as do the seats. With the hood, side panels, and trunk lid closed up, nobody would ever suspect that it’s a battery powered car with 800 hp lurking under the hood. The only clue that a casual observer might have is if he/she peeks through the louvered side panels. They would see lots of chrome, polish, and hot rod parts….but no engine. Whatta sleeper!
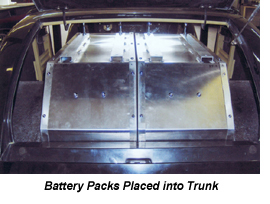
 With the wheel wells tubbed into the trunk 12” on either side, there isn’t a whole lot of room for batteries. You can see that the two battery boxes are a snug fit. No room for a rumble seat, and not even room for a bag of groceries. I guess that’s okay….this car isn’t a “grocery getter” anyway. On either side of the boxes there’s a Manzanita Micro PFC-20 battery charger, each mounted on its own shelf. The car can plug into either 120 or 240 VAC through two chrome recharge plugs, mounted in the pan below. The left plug is in the same location as the original ’34 gas filler. Full recharge time from 240 is about 3 hours. The battery boxes can be lifted into or out of the trunk with a hydraulic cherry picker. Balance is critical, and it’s a delicate 2-man job. With the wheel wells tubbed into the trunk 12” on either side, there isn’t a whole lot of room for batteries. You can see that the two battery boxes are a snug fit. No room for a rumble seat, and not even room for a bag of groceries. I guess that’s okay….this car isn’t a “grocery getter” anyway. On either side of the boxes there’s a Manzanita Micro PFC-20 battery charger, each mounted on its own shelf. The car can plug into either 120 or 240 VAC through two chrome recharge plugs, mounted in the pan below. The left plug is in the same location as the original ’34 gas filler. Full recharge time from 240 is about 3 hours. The battery boxes can be lifted into or out of the trunk with a hydraulic cherry picker. Balance is critical, and it’s a delicate 2-man job.
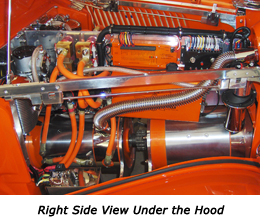
The roadster arrived home fully-painted, and with about 95% of the mechanical work completed. I planned to do all of the electrical work myself. First estimate was that I could design and install all of the wiring in about two months. Boy, talk about another gross underestimate! I don’t work on the car each and every day, and I put in only 4-5 hours per day when I do work on it….so things are taking extra time. Actually, if the truth be known, I’ve taken my eye off of the finish line, but I’m enjoying the journey immensely. The point-to-point wiring diagram is 3 ft. wide by 7-1/2 ft. long, and continues to evolve as I go along. Not forgetting that the car should look consistently nice throughout, the wiring had to be top-notch also. Well, top-notch takes a lot of planning and tons of extra time. Finally, all of the wiring has been completed in the trunk, underneath the car, on the floorboard, and totally under the hood. The motor compartment itself took 5 weeks to complete, but I think you’ll agree that it looks neat and tidy. It’s my philosophy to make all equipment serviceable. Everything in and on the roadster can be removed as a module or subassembly, thanks to a lot of connectors in the wiring. Even the 80 lb. power electronic assembly under the hood can be disconnected and removed in minutes with lift rings. All 36 mating connector sets took a lot of extra time.
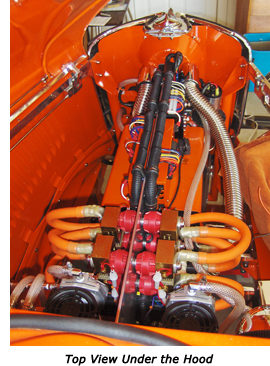
 The photo to the left shows the chrome motors, and even the Cool Flex hoses that draft cooling air into each motor. The black box next to the Hairball contains circuits that enable the motors to idle at up to 500 rpm. Idling is necessary since there’s no torque converter on the automatic transmission. The photo to the left shows the chrome motors, and even the Cool Flex hoses that draft cooling air into each motor. The black box next to the Hairball contains circuits that enable the motors to idle at up to 500 rpm. Idling is necessary since there’s no torque converter on the automatic transmission.
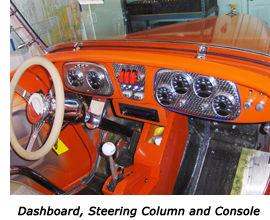
With its engine-machined stainless panels, the dashboard came out excellent. It is, of course, the central point for all of the wiring. About 100 wires and data cables converge here through 13 mating connector sets that permit easy dashboard removal. The The 3.75" diameter speedometer and tachometer are centrally located in front of the adjustable steering wheel. The four ammeters and voltmeters are located in the old glove box area, and at 3.00” diameter they’re large enough for the driver to read without glasses. All switch knobs are polished aluminum, and all indicators are gnarly-looking chromed LEDs. The Quarter-Stick shifter is located at the bottom of the console within easy reach of the driver. There’s even an AM-FM-CD player so that mama and I can listen to the Beach Boys while we’re out cruising.
 The central panel in the dashboard is interesting. It allows easy access to a lot of important functions. At the bottom, there is plug-in access to the two Hairballs so that control parameters can be set from the driver’s seat by plugging in Palm Pilot programmers. The Palm Pilots are stowed in the console box while plugged in. There are LEDs to indicate the traditional CHECK ENGINE and BATTERY LOW functions. There’s a switch to turn on or off motor cooling. Another switch activates low or high controller cooling. And in the middle are covered switches used for racing only. The LINE LOCK on-off permits power burnouts. The DIFF. LOCK on-off electrically locks or unlocks the rear end. And the PWR. MODE selects either VALET (300 hp) or RACING (800 hp) modes. Considering that the car weighs 2450 lbs. 300 hp ought to keep up with street traffic with no problem. The central panel in the dashboard is interesting. It allows easy access to a lot of important functions. At the bottom, there is plug-in access to the two Hairballs so that control parameters can be set from the driver’s seat by plugging in Palm Pilot programmers. The Palm Pilots are stowed in the console box while plugged in. There are LEDs to indicate the traditional CHECK ENGINE and BATTERY LOW functions. There’s a switch to turn on or off motor cooling. Another switch activates low or high controller cooling. And in the middle are covered switches used for racing only. The LINE LOCK on-off permits power burnouts. The DIFF. LOCK on-off electrically locks or unlocks the rear end. And the PWR. MODE selects either VALET (300 hp) or RACING (800 hp) modes. Considering that the car weighs 2450 lbs. 300 hp ought to keep up with street traffic with no problem.
Actually, as of this writing, the wiring behind the dash is not yet completed. Also, not quite having 100% of the batteries and LED multiplex electronics in hand, the roadster has a little ways to go before it goes in for upholstery. The upholsterer will do the carpeting, seats, and trunk in a medium tan. They’ll also need some time to build a custom removable Carson top. More later as this project winds down….
|
Café Electric, LLC
Otmar Ebenhoech
http://www.CafeElectric.com/
Dennis Berube
DC Motors by Dennis
602-377-7583
http://www.currenteliminator.net/
High Tech Systems, LLC
Derek Barger
18951 E. 16th Ave.
Aurora, CO 80011
303-537-1642
Derek@HighTechSystemsLLC.com
ev-battery.com
949-497-3600
http://www.ev-battery.com
Jim Ludiker
mrgofast99@aol.com
Killa-Cycle Motorcycle
Bill Dube
http://www.killacycle.com/
KTA Services, Inc.
Wistar Rhoads
20330 Rancho Villa Road, Ramona, CA 92065
1-877-GO-KTA-EV
http://www.kta-ev.com/
Lawless “Rocket” Motorcycle
Shawn Lawless
lawlessind@yahoo.com
Maney Wire & Cable
For all your wire, cord and cable needs
Dan Boland
3959 E. Guasti Rd., Unit E
Ontario, CA 91761
909-230-4900 1-877-469-9473
www.maneywire.com
sales@maneywire.com
Mickey Thompson Performance Tires and
Wheels
http://www.mickeythompsontires.com/ |
Manzanita Micro
Rich Rudman
26125 Calvary Lane NE, Suite 300
Kingston, WA 98346
360-297-1660
http://www.manzanitamicro.com/
National Electric
Drag Racing Association (NEDRA)
http://www.nedra.com/
National Hot Rod Association (NHRA)
hotrod@sourceinterlink.com
http://hotrod.com/
R J Fabrication
Rob Lindsay
5621 Stonehenge Ave.
Hesperia, CA 92345
760-244-7410
http://www.RJFABRICATION.com/
Total Cost Involved Engineering (TCI)
Sal Solarzano
1416 West Brooks St., Ontario, CA 91762
1-800-984-0223
http://www.TotalCostInvolved.com/
Ultimate Customs
Brian Noppert
1344 S. Bon View, Ontario, CA 91761
Tel/FAX: 909-923-4417
bnoppert@hotmail.com
Wescott’s Auto Restyling
Karl Wescott
19701 SE Highway 212, Damascus, OR 97009
503-658-3183
http://www.wescottsauto.com/
Westberg Manufacturing
Pete Cornelius
3400 Westach Way, Sonoma, CA 95476
707-938-2121
Westach@comcast.net |

Ken Koch's 34 Ford
Roadster EV Project | Resources
and Links | Technical
Articles
Trains | Planes
| Specialty
Automobiles | Boats
and Submarines | Home
© 2008-2013 EV Consulting, Inc.
Site Design by Chip Gribben - Digizone
Designs |
|
 |